


How To: Set Up Your Shipping Rates In Shopify

There’s one more important step you’ll need to accomplish before you start selling.
Your new e-commerce store has finally launched and you are ready to sell! But wait. There’s one more important step you’ll need to accomplish before you start selling. You’ll need to configure your shipping profiles to accurately charge customers for shipping during the checkout process.
Shopify’s shipping functionality is actually very robust and includes the ability to heavily customize your shipping options. Let’s take a look at how to do this in the Shopify admin.
1. Click SETTINGS in the bottom left corner of your Shopify admin panel.
2. Click SHIPPING AND DELIVERY.
Now that you are in the Shipping Settings, the first thing you want to do is make sure your locations are accurate. If you are shipping from a warehouse separate from your primary corporate address, for instance, you’ll need to add the warehouse as a location under the LOCATIONS section in the main settings. Once you have your locations set up properly, they should all appear dynamically on the Shipping page.
SHIPPING PROFILES
If you need to charge specialized rates for specific products, you will need to configure separate shipping profiles. If all products can generally follow the same set of shipping rules, you only need a single General Shipping profile. Within the General Shipping Profile, you can set rules based on location, weight, order total, etc.
3. Click MANAGE RATES
SHIPPING ZONES
If you are shipping internationally, you may want to set up a separate shipping zone for domestic vs. international. This will allow you to configure different rates and different carriers depending on where the buyer is located.
4. Click ADD RATE
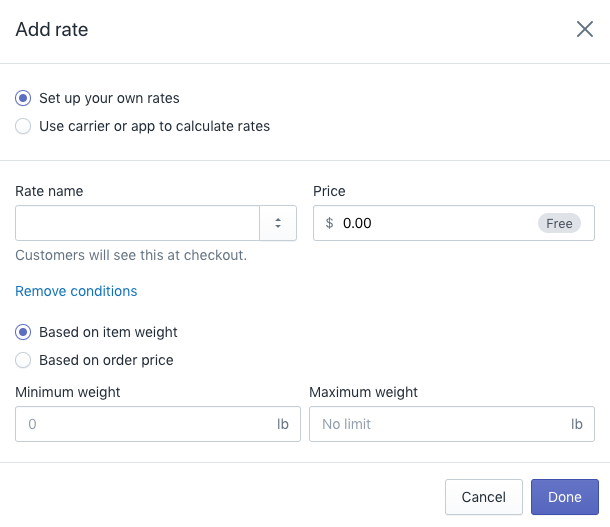
You can choose to set up your own rates (if you prefer to charge flat-rate shipping, for instance) or use a carrier or app to calculate rates (if you want to charge USPS standard rates, for instance). If you set up your own rates, you can add conditions such as basing the shipping cost on an item’s weight or the total order price.
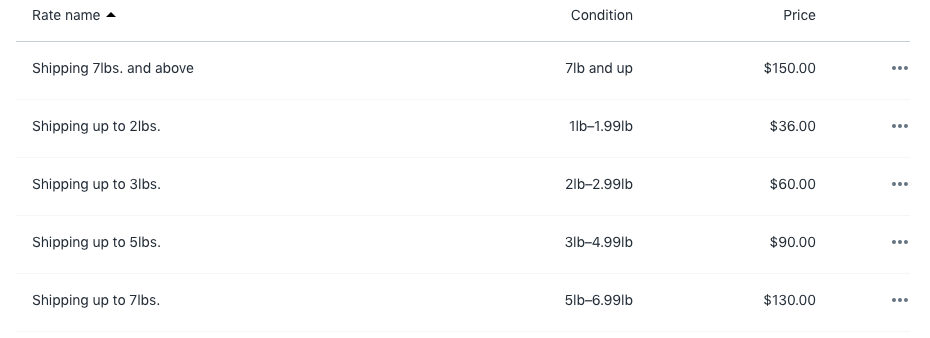
CALCULATING SHIPPING BY WEIGHT
If you set up your own rates by weight, you’ll need to make sure you assign a weight to every product in your Shopify storefront in the PRODUCTS section of the admin. Shipping will not calculate correctly if products are not assigned a weight. If you set up your own rates by weight, you’ll need to configure a separate rate for each weight tier. See an example below:
SPECIALIZED RATES
You may also want to add specialized rates, such as free or reduced shipping for customers who are spending a certain amount of money, or free shipping for customers who want to pickup their items in-store. These can be added at the same time you configure your standard shipping rates. See an example below:

5. Once you add your rates, be sure to click SAVE!
If your items require specialized packaging, you can add custom packaging options in the PACKAGES section below the SHIPPING section, or you can use carrier-standard packaging. Shopify also offers the ability to buy and print discounted shipping labels directly from the platform. You can print them using a standard printer, or purchase a label printer from the Shopify hardware store.
Once configured, your shipping options will show automatically during checkout. If the shipping conditions are based around cart variables such as the total order cost or weight, this will calculate based on what's in the cart and apply automatically during checkout. If you've given your customer options, such as in-store pickup, the customer will have the ability to choose the shipping option they prefer during checkout.
For help configuring your Shopify store’s shipping, reach out to H1 Web Development today!


